
New AdWords Top 10 Tips For 2018 – Tips To Make The Switch
Transcript (video jump links below):
I figure it’s a good idea right now to start looking at the New Google AdWords especially since Google is about to finalize the launch of the new AdWords. It’s in beta mode, but, everybody can use it right now. Hopefully you are already using it if you are a PPC specialist. Whether you are or are not, this should give you some good tips of what is helpful with the New AdWords.
Google’s has announced that it is going to be officially launching the new AdWords, and shutting down the old AdWords in late 2018. This is coming up quick! – see Google’s Announcement from May 7, 2018.
This particular video is designed to go through some tips. The Top 10 Tips For Google’s New AdWords – looking at features that you may not have known about. And what makes it a little bit different and better than old AdWords.
The transition to the new AdWords was difficult and I started right when they launched the beta testing last year. I started using it but I was going back and forth all the time because I’m like I can’t stand this… go back to the old AdWords. Now I predominantly use the new AdWords. There’s only a few things that I use the old AdWords for, and I’ve put those things into recommendations for Google because they are looking for feedback on issues they need to change in the new AdWords to make it better. Especially before the full official launch. So if you have suggestions, go to their feedback option, right at the top right corner of the new AdWords, and you can submit things you’d like to see improved.
Tip #1 – Keyword Planner Is Back
1m:50s (YouTube jump)
The New Keyword Planner is much better than it was, and it’s actually tracking stats again for keywords. Which is awesome, because I am an SEO as well. It’s great to have access to those details again. So the way it’s found in the new AdWords is a little wrench at the top right, and then under the “planning” section. When the beta started there was no wrench here, there were just some dots. Now they have a wrench which indicates this is where you’re going to get things done.
If you are a multi-tab using guy in Chrome like I am. Where I have 20 to 30 plus tabs open at all times. AdWords really seems to bog down and there’s a cache thing that happens where it just takes time to load things. So it’s something I have mentioned to Google. Let’s take a look at some keywords here. So, let’s go SEO Vancouver, or let’s make it a little longer. SS services Vancouver. See search volume and forecasts. Yes, so that’s what we want to do, hit Enter get started.
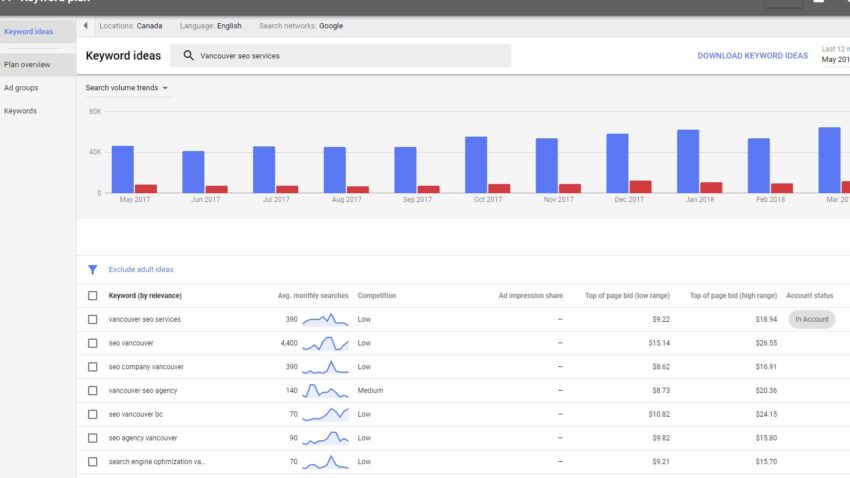 Here it is with one keyword, “Vancouver SEO services” It’s got a beautiful layout. It shows you kind of the peaks throughout the year, it gives you optional and related keywords. Top of page bid- lower range, top of page bid-high range. For bidding on this you’re spending between $9 and $18 for top of page clicks. Now that may not be incredibly accurate especially if you’re doing sweet ninja skills with your PPC campaigns making use of good keywords, negative keywords, bid strategies, and your quality landing page. All those factors that every PPC knows applies to good PPC. But just look at that I mean it’s great; it gives you the average monthly volumes. Tells you the competition rate, and it just does it in a neat way. And all of these things can be added to your plan or to your ad groups if you wanted to create a new ad group. You can do it right here, you can choose what type of match, broad match; phrase match, exact match. Doesn’t have broad match modifier, unfortunately. But yeah, so you can just add it right to your plan.
That’s pretty sweet, so that is tip number one. Keyword planner is back and functioning, and it’s awesome!
Tip #2 – Campaign Setup Functionality
4m:50s (YouTube jump)
Google has really improved this functionality, in fact, several of my next tips all kind of relate to the whole campaign setup process. So, let’s just take a look here. For This campaign example I already have an account set up so all the information is here. I already have one campaign setup. What I’m going to do here is just go to the campaign level, go to campaigns and then click the little plus. I’m just going to walk through a setup here real quick. So what type of campaign are we setting up?
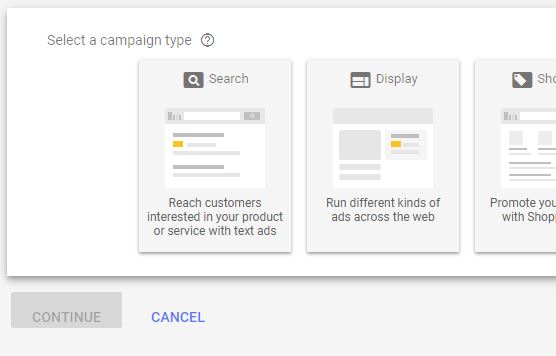 Search display, shopping, video or universal app. We’re doing a “search” campaign for this one. I want the focus to be “leads”. This goal is an interesting thing I don’t know how much it actually affects the strategy. Because I’ve seen campaigns that were setup in old AdWords that I’m now managing in new AdWords, and they don’t have the goal set yet. But the campaign still functions fine. So I go in later and I check mark the goal to make sure that it’s set to leads. I don’t think it actually does anything but you know you, just want to have that there incase.
I am targeting website visits, so it asks for the URL of your website so we would just set it up…actually, you don’t need to have HTTPS. Google will intuitively know what your site is set up with, mine is, of course, secure because I’m a SEO. I know that it is important! Next, phone calls, yes I want to use a phone call extension, so we have to add the phone number here. I do not live in the United States, I am in Canada. So I have to scroll; scroll, scroll .. Darn you United States for being so much a part of every single program I use. No problem, we love you. Haha, you brought us Google.
So, we put in the phone numbers here which is … do I have this right? Yes! it is. 18447007774, here we go. That adds my call extension, now brings you to the next page. It shows you a summary of the goal here. What do you want to name this campaign? Well this is a local campaign and I’m running it, so I’ll set it up as “Local”. You can title it whatever you like. I will divide it into different things depending on what I’m doing for my clients. In this case, I’m running a little campaign for myself, so I’m just going to call it “Local”.
So, it’s on the search network already which includes Google search partners. Yes, we want that. Do we want to add display network? Not at this time. Locations, so I just…I already like the way this is laid out, it’s in these little cards that are kind of easy to see. This is a local campaign so I want to target a location, not all of Canada, so I’m just going to target the province of British Columbia which is where I am. Here we go, and yeah target the whole province. Budget this is your daily spend, so let’s say you have $600 budget. You will to calculate 600 divided by 30.4 because that’s the conversion factor or the multiplication factor that Google uses for determining monthly spends. It comes out to $19.73, I’ve done this enough times to know that by heart.
Delivery method – I am just going to use standard delivery because I don’t want to blow the budget way too fast. Bid strategy, we can’t modify… what? Did this just change? You usually cannot select this, it will show you options but you can’t select them. I can select them here, okay. This might be because I already have a campaign setup that’s probably what it is. In this account. Usually you can’t select anything but manual CPC to start with. And then you have to come back later after you’ve got the whole campaign set up and change that. That’s kind of a pet peeve of mine the other thing is, …So I’m going to use enhance CPC for this one, in the old AdWords it has this information here and you can just hit save and it will use what was imputed here. In this one it actually wants you to type in something, so I just copied that and now I am pasting it, exactly the same thing. Why are you doing that to me Google? I don’t know, so now it’s in there and I can now save that.
You can see the call extensions here. I totally typed it in wrong, it supposed to be 844. Good thing I had it in my old campaigns, so it knows it’s there. Yes, I make mistakes!
Okay, so I’m not going to go into any of these other additional settings except for Location options. I’m targeting people in my target location areas. I don’t want this to be a national campaign. I just want it to be local. I probably won’t have an excluded location but when I do this “people in your target locations”, I also set this up for “people in your excluded locations”. Bingo, Bango, Boomo! Save and continue.
Tip #3 – Ad Group Stacking
10m:45s (YouTube jump)
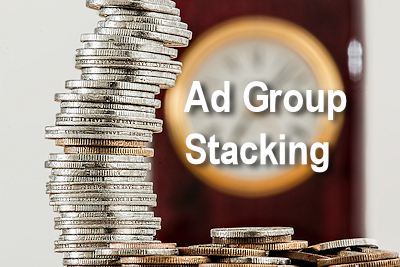 This is sweet! Basically, ad group stacking allows you to create your ad groups in a pile, so you don’t submit until you’ve got all your ad groups. I love this feature especially because I work with clients all over the place. You know some of them have 10 plus ad groups, and for each of them, you can stack their setup. It’s really simple. In my example, I call one “Vancouver”, with a default bid at $2.
Then you enter the keywords right there. I like to have my keywords list pre-created. I don’t have them for this demo, so I’m just going to put “Vancouver SEO services”, “top Vancouver…”. The Get Keyword Ideas section pulls info from Keyword Planner. I typed SEO in there and see what it pulls up here for me. So “online marketing”, “internet marketing” we could add all these things that relate.
It is just excellent that you can do all this right in one place. You can see the monthly search volumes on the side here … beautiful. So let’s finish this one up “SEO in Vancouver”. I’m just making these up, these are not researched I’m just doing them for the video. You get the idea.
Next, you do not save and continue, you go and add a new ad group. What? No way!? Yes, now you’ve got this one in view, and this one in view. So let’s lable this one as “Burnaby”, same thing $2. Let’s go with “Burnaby SEO”. It processes, “local SEO services”, “SEO Burnaby”. It’s not really focusing on my location specific information here which is fine but it does give you monthly volume amounts. So you can see local SEO company all of these things I can add. I’ll probably add these to my main ad groups because I wouldn’t add it necessarily to Burnaby. But for the sake of this video, we will stack them.
We can keep stacking this and that’s the beauty of it, so this is tip number 3, “Ad Group Stacking”. We save and continue. It’s now created those ad groups and now it has the ability to create new ads in a card format. So this is also cool, this is now “ad stacking”.
Tip #4 – Ad Stacking
14m:35s (YouTube jump)
 So, now we’ve got ads here if we had 10 ad groups we would have 10 ad options here. So what I like to do, I’m just going to do this with some fake information, it’s not really the URL that I’m going to be sending traffic to. Keyword insertion – I like to use keyword insertion which just pulls what people are searching and throws it into the title of the ad. So, let’s just go with “SEO services”, this is in Vancouver. You get the idea. I don’t think the case matters there, but I will change it anyway just for formatting. Apply.
This will create that keyword insertion so it’ll overwrite this here on the ad. The other thing that shows is the ad preview on the right side. Which is really nice, and you can kind of get a couple different views on desktop or mobile how it looks. It’s has your call number there for your call extension I should say. This ad title here will change with your keyword insertion. You probably already know that.
I like to create a path that relates to whatever the ads are about. So, “SEO Vancouver” and then description, let’s just say, “top SEO services”, “short-term contracts”, “monthly reporting”, “full service, white hat. I’ve gone over the limit, there’s 80 characters allowed. So, let’s just get rid of “top”, and just leave “SEO services”.
Now here is the cool thing with ad stacking. They also have a feature called that I call a “ad copy; copy”
Tip #5 – Ad Copy Copy
17m:34s (YouTube jump)
 So you can take these ads, copy them. So what I like to do is do a little switcheroo here. I’m going to take this headline. I forgot to put the second headline, that’s great there. Really good for the video. Let’s fit a little Arneeon Media kind of my branded headline. So I got the headline, I switched out the; the headlines here for this one. I just switched the order keeping everything else the same, and done.
Copy, now we have 2 different ads I can edit this one and put something. Let’s put “Top SEO services”. This one is not branded necessarily except that it already has the links to it. Click Done.
The other part with this ad copy; copy tip is that you can just skip this. Let’s say we had 10 different ad groups here, right now I’ve only got 2 for the sake of this video. If we save and continue, it just confirms some of the details here. We’ve got our 2 ad groups right here.
In Vancouver the ads are created right here, so now I can take these. Checkmark them all. Click copy, and go to the Burnaby Ad Group and use a little paste Badoing! It throws them and you are asked if I want them to be paused. Yes, I do! If I was doing this on a live account where the ads were running I would, of course, want them paused. And now I can just go in and edit the links, the URL, and the keywords. I can format them the way that I like, and I can do that for every single ad group. Copy my ads, so I got the ad copy, copied to each of the different groups. Sweet; sweet I love how it just streamlines the whole process. So that is tip number 5. “Ad copy; copy”.
Tip #6 – New Audience Manager
20m:23s (YouTube jump)
 The new AdWords has a feature now where you can go into your audience manager under the little wrench icon on the top right. Audience manager is in the shared libraries. If you are using the global site tag conversion tracking method that AdWords provides where you have to place a global tag on your site. That global tag already has the ability to create audiences for you. You don’t have to add any other scripts to the header of your site. That global site tag will do the trick for you, so you can begin to build lists. So I just have one here but what it does is, what the audience is available for. The different networks that it has met the criteria for. You can look at audience insights; you can look at audience sources.
Here’s the AdWords tag and it saying there’s two lists connected with that and with analytics. Is just a clean way to set up your remarketing. So, if you’re doing your display remarketing or any type remarketing you can do that right here. You can see how it works with display. This is just an example list. I think you need up to 100-plus in the audience to be able to market to them. So I’ve got the list “combined audience”. This is what I was looking for, it shows you right here whether it is a compatible audience or not.
So we can use this, add it to any ad groups. So let’s say we add it to the local campaign that I set up. I will add it to both ad groups; next, choose a targeting settings for the audience. Let’s do smart default. Use current ad group settings for the added audiences, yes let’s use that. Add the audiences so now they are added. And what I can do now is I can set up my display ads and I can remarket to those site visitors. You can also do a targeted search remarketing as well RLSA (Remarketing Lists for Search Ads).
Here’s a little extra tidbit: The overview window is very nice as well. So this little dashboard that it sets up with these cards gives you an overview and a snapshot of different parts of your campaign. So this campaign’s not running, otherwise you would have more information here. It shows you your keywords. It will actually show you the top search terms that are being used. It will show you your location targeting, ads schedule – heat maps, it shows you a preview of the ad. If I had sitelink extensions on it, which I don’t have yet on this campaign, I can hover over it; it will actually show on here just below these ads. That’s just an extra little tidbit. So tip # 6 was the audience manager which is just a much more robust way to look at your audiences and interact with smart marketing.
Tip #7 – Landing Page Analysis
24m:6s (YouTube jump)
Now, this is really cool tip making sure that your landing pages are responding and have a good user experience. The Landing Pages feature basically shows you the metrics of your landing pages. This can help make your quality score better. You can just improve your campaigns overall with the metrics that it gives, I have to show this kind of in a sneaky way because I have to use one of my client’s active campaigns to be able to show it more fully. Sorry for the blurring out of things here but basically it shows you each of the different main landing pages and the stats.
You will notice there’s mobile friendliness that shows you whether it’s valid; whether there is an amp page involved; Clicks that you’re getting; impressions, click-through rate, average cost per click, whatever you set up in your filtered view. Which we’re going to talk about in one of next tips. This is just great for making sure that you are meeting the quality score. Your landing pages are a good user experience, huge for optimizing your PPC strategies.
Tip# 8 – Custom Saved Column Filters
25m:24s (YouTube jump)
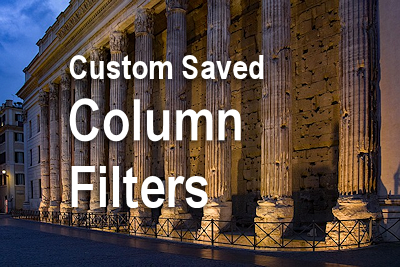 Basically at every level of your account. You can set up custom saved filters. I’m showing the campaigns; and then campaign level and then go into the ad groups. One of the campaigns at the ad group level, you’ll notice that it shows the stats here. This is kind of a default filters for the columns I guess it is…it could be titled something else besides save filters.
I call it filters because there are other filters that you can use to show attributions factors, attributes etc … whatever you want to set up. You can apply different filters to what you see here below this line. But what I’m talking about in this Tip is your column views. You can save or filter your columns and do it in a custom way for every single account in your MCC. And I believe you can apply it to each ad group. However, you set it up for each client basically is how it’s going to work.
If I wanted to change these columns you’ll notice it just has generic stuff. This is not the stats view that I like to see. I don’t care about ad rotation. I don’t care about ad group type, and I don’t care about active bid adjustments right now for my general view. I like to have the performance metrics, I like to average position showing. So I’ve got clicks, impressions, click through rate, cost, and average position. And then I like to have conversions, which is already set up as a conversion model format. You’ll notice that it’s marked here, over on the right-hand side conversions is there. But I also want cost per conversion and conversion rate.
So, now I added those, you can move the order around if you want to. I like to have impressions above clicks to me that makes more sense because you get your impressions first before you get your clicks. At any rate that’s totally up to you. You decide what you’d like to customize it as. Then down here in the bottom there’s a checkmark box. You set up your title “standard”. It’s my standard filter you can name it whatever you want, save it, apply it. Now it changes the columns so that it shows what and how you want it to show.
You can also shrink or maximize each column. One of the things that I didn’t like about the new AdWords is this window. There just seems to be less real estate to see what you want to see. However you can shrink all these columns, they are all adjustable. What I’ve got here now fits. So, I don’t have to scroll sideways. The other thing you can do is hide your left navigation bar which just opens this up even more.
So, then you start to get that old AdWords feel with the white space and the graphs, and everything’s looking more appealing. Up on the top you can say whatever you want to view on your graph. So that is Tip number 8, Custom Saved Columns or Saved Filters.
Tip # 9 – Notes On Your Stats Charts
29m:20s (YouTube jump)
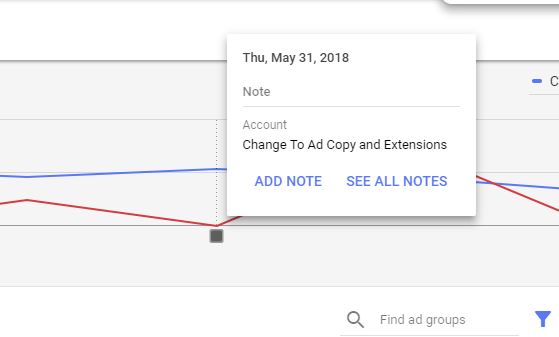 You can now apply notes on your stats. Similar to what you can do in analytics, so let me just show you here. So we’re looking at a 7-day view right now. I’m filming this on May 30th, so it’s getting in the last 7 days May 23rd to the 29th. You can now add a note, let’s see. Let’s go to our ad group view, choose one of the ad groups. Actually, we could select all of them, so it applies to all of them. And what it’s going to do here is, it’s going to create a note. So, let’s say that I just, I’ve been running this campaign for 3 months. It’s kind of plateaued and not much is happening I make a huge decision and do a bid adjustment.
So, I changed the bid strategy. So let’s say I had it on Enhanced CPC, and I switched it to maximize conversions. Sometimes I do that on campaigns that need a little help with the budget where it’s reaching a limited budget and you have done other changes already. Sometimes when you switch to max conversions, Google uses its own proprietary measures and algorithm measures to work within the budget a lot better. And sometimes you get really good results doing that.
So, let’s say that I did that I switch this to maximize conversions. So I see this note. What happens is that note, we can’t see it now because of the view that we’re on. It puts this little tag on here. So this tag will actually follow this timeline so if I was expanded out to…Let’s say I was doing a custom view I won’t be able to do it now because the tag will always be at the end. Because it is this day that we’re on.
But you could have multiple tags on here all indicating different tasks or things that you’ve adjusted or tweaked on your campaign. And then you can watch the stats after that change. I’ve got this tag here when I hover over it, its say’s maximize conversions were implemented. So, now if I’m watching these stats a week down the road. I can see, “wow!” after I implemented that change my conversion shot way up here. This adjustment really helped the AdWords algorithm to work well and optimize the campaign going forward.
So, you can make a note of that. I keep track of things and spreadsheets and I like to test things. But it’s just a great way to visually see that on each of your accounts where you’ve made major changes. I simply love it. So, that is Tip number 9, Notes on your Stats Charts.
Tip #10 – Time Window Chunks
32m:30s (YouTube jump)
 In the new AdWords, there’s an option to create your time window here. So you’re … this, of course, is in the old AdWords as well. But let’s say we are at 7- day view. Example we’re looking at stats for May 23rd to May 29th. These are now chunked together so I can go back in 7- day increments, this doesn’t look as effective as it would if this was an active campaign. But you get the point here is it creates a chunk of time and allows you to go forward and back in those specified chunks.
So, if we change this to 14-day view, now it’s showing 14- days, nice switch. And it’s showing 14-days back; back; back. It just keeps doing that.
In your custom and all-time view, one thing I don’t like about the all-time view in New AdWords is it tends to show a massive time frame that doesn’t apply to the campaign itself. So, that’s something I’m submitting to Google to change. When you go to all-time view in the new AdWords. Look at this it goes back to November 2015; well I didn’t have ads running back then. So, what ends up happening is you end up with this long line here. And then, you know somewhere a year ago when your campaign started that’s when you start to see your stats. So the all-time view in my view is bad. I believe it did it corrently in the old AdWords. I can’t remember now, I think I’m pretty sure did, it showed you from when the campaign started that you were looking at. That’s what it should be doing. This is one thing I don’t like and it’s that all-time view BUT this ability to move in these Time Chunks is great.
Example 30 days view it shows from the 1st to the 30th and then March 2nd to the 31st. So it’s flipping through 30 day chunks. Now what if we go to full month chunks let’s see what it does with last month. Does that actually work? Yes, it does look at that; it goes March 1st to the 31st that’s a longer month. Flipped forward, now its April 1st to the 30th. So, it’s a shorter month and it actually knows that, so really cool. I like that part of the new AdWords!
So there you go, guys, a Top 10 Tips and Tricks for the New AdWords.
Bonus Tips
Now there’s a lot of things I didn’t go into. I went into one bonus there when we looked at the overview dashboard.That is a cool updated feature. Another one is “recommendations”, that’s another great little enhanced tool works quite well. The recommendations it gives, it does it in a neat way. It will allow you to see kind of why it’s recommending what it’s recommending. And you can choose to implement the recommendations you like.
Another thing I didn’t go into is that you can do experiments and run split testing with different bid campaigns. Not just the one that Google suggests. For instance if you’re running an Enhanced CPC campaign Google will recommend that you try a Target CPA experiment. And it makes it look like that’s the only one you can try. But in the drafts and experiments area of the new AdWords, you can create new experiments at any time. Set them up for a month or time frame you choose and run them. It will split 50:50 or whatever percentage you decide. It will split your budget and it will run 2 simultaneous campaigns with exactly the same ad copy keywords etc. Everything exactly the same with 2 different bidding styles. And you can see clearly which one is winning, So that’s another great feature.
So I’ve given you 3 bonuses with these Top 10 tips, I hope you invest in the using the new AdWords soon and end up enjoying it,
Especially if Google will start to implement fixing things. Like their caching issues for instance where it holds page information. When you flip to other pages it’s still holding the other client’s information there. You’re not on that client anymore. Please; please Google fix this! That doesn’t happen that often but it does happen, along with other weird caching things. You saw a little bit of it here in the video as well.
Thats the Top 10 from Derek with Arneeon Media:
I hoped you enjoyed it.
I am a PPC and SEO Specialist and I love digging into helping people get their websites active online with effective digital marketing.
My motto for Arneeon Media is, “we are lifting your spirits by raising your ranks” and we are turning lambs into lions online. Peace out, have a good one.
Want results like this for your business?
Book a strategy call and we will map out the steps that fit your situation.